Tips to achieve realistic lighting and graphics in unity HDRP
Often if you download a model in sketchfab and import it into unity, you wont be getting the same 3D quality which you see in sketchfab or other sites model preview. This is because sketchfab built their own in-house rendering engine based on Physically Based Rendering which could render using Webgl.
Their Physically Based Renderer achieve a new level of realism for online 3D models. PBR is based on real world values, making it more accurate and consistent under all lighting conditions. It is the technology that powers AAA video games and high end renderers.
Unity also supports PBR workflows and one can achieve high fidelity graphics in unity using HDRP pipeline.
A free Model in sketchfab:
My Unity Output:


In this post, I wanted to share my experience on how I usually achieved high fedality indoor graphics in unity from a downloaded model.


You can download free office/ interior models from these following websites…
“Free 3D Models | CGTrader” https://www.cgtrader.com/free-3d-models
But both CGTrader and CGmodelX doesn’t provide free models with universal fbx format or atleast not with textures embedded on them. Out of these two, CGTrader provides FBX,OBj and other formats without textures which can be directly imported into unity then we can manually link the textures to materials, but CGmodelX provides only .max files which must be converted into FBX or OBJ using 3DSmax software before importing into unity.
What is PBR?
Physically Based Rendering (PBR) is a method of shading and rendering that provides a more accurate representation of how light interacts with surfaces. It can be referred to as Physically Based Rendering (PBR) or Physically Based Shading (PBS). Depending on what aspect of the pipeline is being discussed, PBS is usually specific to shading concepts and PBR specific to rendering and lighting. However, both terms describe on a whole, the process of representing assets from a physically accurate standpoint.
PBR is a methodology, not necessarily a hard standard.
To know more about PBR settings inside Sketchfab,
https://help.sketchfab.com/hc/en-us/articles/204429595-Materials-PBR-
Physically Based Rendering has become the standard for renderers and game engines. Its increased predictability (plug in real-world numbers and get real-world results), wonderful lighting and overall increased realism offer huge benefits for artists.
https://learn.unity.com/tutorial/creating-physically-based-materials-unity-2019-3
Both unity’s HDRP and UWRP rendering pipelines support PBR workflows.
In UWRP, standard shader should be selected and in HDRP, lit shader should be selected for including PBR workflows.
I suggest you see the following videos for getting a better understanding on PBR,
Brakeys PBR unity settings link:
https://youtu.be/_LaVvGlkBDs
Unity Guru’s PBR workflow in HDRP and URP link(Old):
https://youtu.be/zd7E2i8zgCE
Unity Guru’s High-quality PBR materials and how to assign them in HDRP(New):
https://youtu.be/Zkogn7Og4Ag
How to generate PBR materials to be used in Unity for Free(Materialize):
https://youtu.be/-LUlfdIZ6IM
And I followed this Tutorial for achieving my results,
Interior setup
Realistic Interior lighting in HDRP:
https://youtu.be/zSMzb0iINek
Materialize Software for creating PBR textures:
Materialize was a superb software for creating PBR textures. If correctly done it will give a realistic depth to materials in your scene.
Bounding Box Software — Materialize: http://www.boundingboxsoftware.com/materialize/
Materialize: quickly make photorealistic materials in unity
You can create your own PBR materials using Materialize or download free materials from Assets store. Here are some of the good materials from asset store:
Real Materials Vol.0 [FREE]
Tips/Problems I faced with solutions for getting realistic graphics in unity:
Tip 1: Directional lights and Shadow angle
When you import a model from other 3D softwares it might come with some lights. My suggestion is to remove those and add a directional light and set the direction of the sunlight towards the window to form shadows inside the room, remember to turn on shadow map setting under Light setting in the inspector, as this will create shadow along the window.
Tip 2: Avoid point lights
After adding directional light, add spot light instead of point lights at the light outlets which comes with the model or be creative since point lights are much more performance-intensive you should use them sparingly.
Tip 3: Light intensity
When selecting intensity for indoor lights, try to make sure no indoor lights have a greater intensity than the sunlight.
Tip 4: Turn on Linear color space
Within Unity we have the option to use Gamma or Linear color space. Gamma is the default used in traditional 3D and 2D game projects built in Unity. If you switch to HDRP you’ll use Linear by default.
Linear approach to light intensity will result in more realistic looking lighting and colors.
Tip 5: Extracting materials
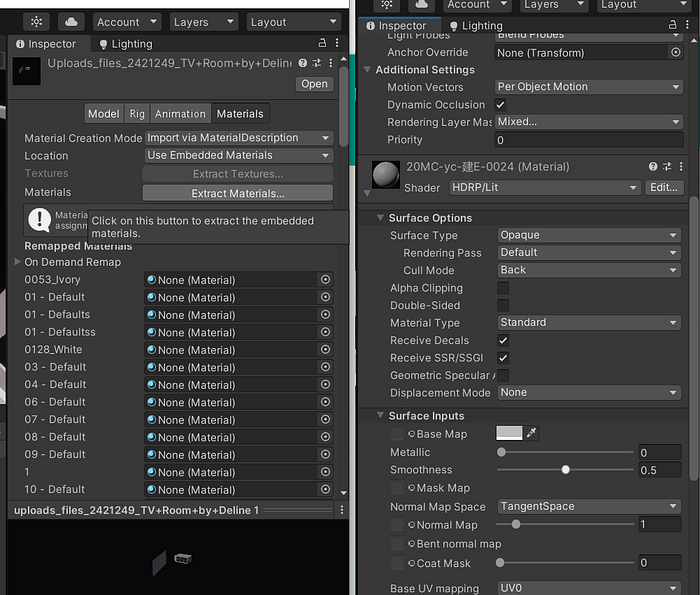
Extracting materials from a model will make it easy for us to change the Shader settings for that model.
Tip 6: Turn on Generate lightmap UV settings in all modes

Make sure that all your model’s “Generate Lightmap UVs” property is checked. Before baking your scene, else lightmaps won’t be generated for those models.
Tip 7: HDRI sky and Lightmap settings
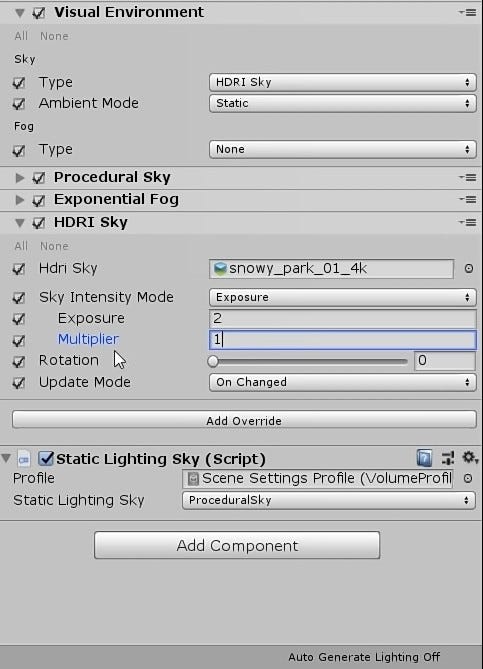
Visual Environment
The Visual Environment override allows you to change the type of sky and fog you want in a Scene.
Make sure you add a HDRI sky from visual environment under Volume component for illuminating a scene because HDRI image provide much better lighting and reflection in both interior and exterior light environments.
Disable the fog unless you want a foggy look and increase the exposure value to a higher value just for baking. Then you can reduce the HDRI exposure value to a lesser value to please the eye. The increased exposure value will illuminate the scene better which gives better results when baking the lightmaps.
You can get HDRP skies from https://hdrihaven.com for free.
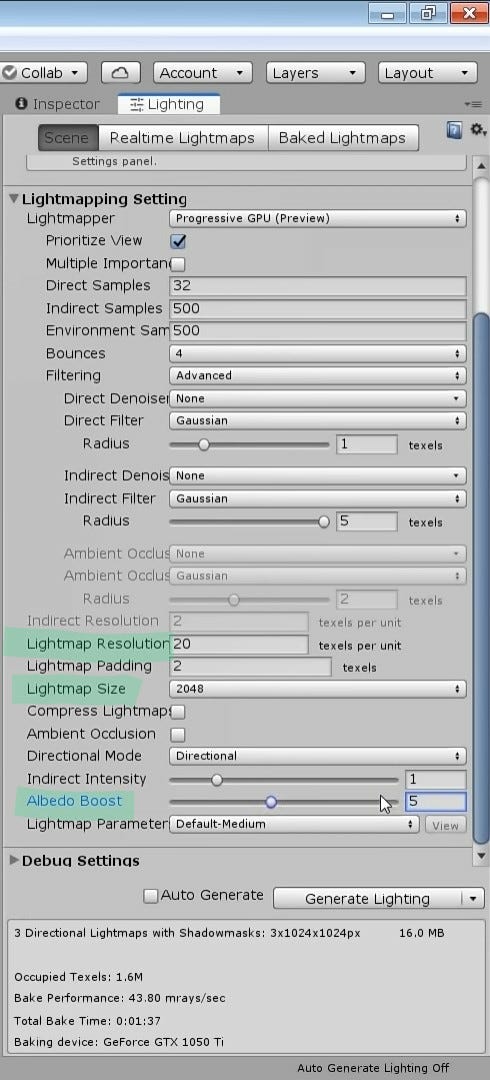
For the lightmap setting, change the lightmap resolution to 20 initially just for checking, then in the final bake you can change it to 40 or more depending on your needs. Then change the light map size to 2048 and the albedo boost to 5.
And make sure directional light could come inside and make shadows in your environment before baking.
Tip 8: Turn off the window glass objects before baking
It would be confusing at first why the glass material didn’t allow light to pass through, this is because like all materials glass also cast shadows. So make sure to turn off cast shadows in the glass object inspector for the directional light to pass through the glass.
Tip 9: Enable contribute GI and Reflection probe static to all objects for including them in baking process


Before baking the environment, make sure you change all the light modes to mixed mode and check if majority of model’s Static Editor Flags are reflection probe static and contribute GI are turned on.
Tip 10: Option to see the Baked lightmaps in scene

After baking the scene you can check if the lighting is baked by selecting shader -> Baked lightmaps and check for light map resolution using shader -> lightmap resolution
Tip 11: Reflection probes
HDRP supports cubemap and planar GPU Reflection Probes to help you produce realistic reflections in your Scene in real time. Add reflection probes and adjust the bounding box to fill the area for getting better reflection to the environment.
Tip 12: Light leaking along the room edges

For light leaking on the edges of walls, you can remove this by increasing the directional lights shadow map resolution property to 2048. This will reduce some light leaking, for further removing this leak, use a dummy wall box called shadow caster, which you could create using a simple unity’s cube around the walls of your room and change its mesh property to “shadow only" for casting only shadows.
Tip 13: Area light tooth Shadow problem
Area light tooth shadow or shadow cascades problem could be removed by increasing the range of Area lights.
Tip 14: Planar reflection
Planar Reflection Probes captures a view in a direction calculated from a reflection of the Camera’s position and rotation, then stores the result in a 2D RenderTexture. By default, the reflected Camera calculates its field of view by setting the center of its projection to the Probe’s Mirror Position, and then expands it until it includes the Probe’s Influence Volume, as shown here:
Interior setup
Realistic Interior lighting in HDRP:
If any jittering appears in planar reflection you can use Screen space reflection under add override in volume settings where you will add all the post processing effects.
Tip 15: Reimporting problems
Deleting and reimporting some of your models might cause unwanted lines in your baked environment. You can simply solve this by regenerating the lighting from lighting tab.
Tip 16: Unity version
Always Use latest Version of unity for HDRP projects. I used 2020.2.This will ensure that your project is stable.
Tip 17: Progressive GPU lightmapper
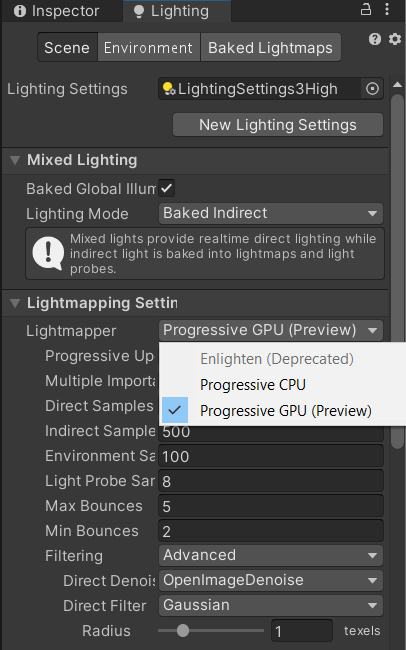
Changing the lighting setting to GPU lightmapper saves a lot of time. My graphics card is GTX1060 with Max Q, but the GPU lightmapper was not working when I generated the lighting, and it switched automatically to CPU lightmapper while generate lighting was clicked. Updating the Graphic Driver to latest version solved this issue. Updated graphics driver is necessary for GPU lightmapper (preview) to work, which is 10x time faster than CPU lightmapper.
Tip 18: Adding post Processing effects
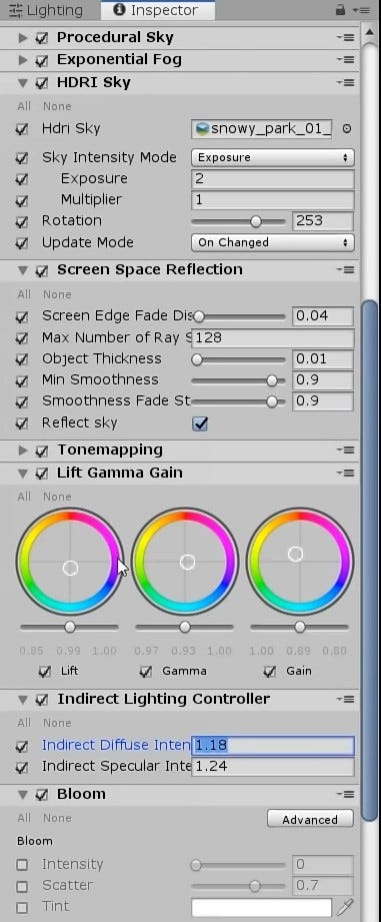
Adding post processing effects will give a rich new look to your scene adding options for lots of light corrections in unity post processing stack. While working on lighting an interior scene, the following post processing components will be very helpful :
Tone mapping,
Lift Gamma gain,
Indirect lighting controller and
Bloom
Tip 19: HD Render Pipeline Wizard.
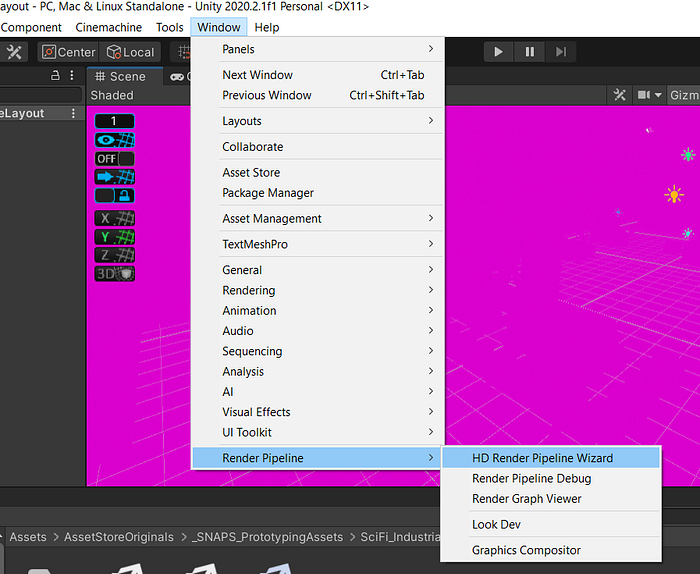
For importing already existing projects into HDRP use, HD Render Pipeline Wizard.
Additional tips:
Emissive Materials:
This glow can be emissive and mimic the effect of lighting coming off this object
Both the object emitting light and receiving this glowing light must be set to static. Once that is complete you should now see the light being emitted. If you have the emission set to realtime, you can utilize the glow even if you don’t bake lighting. Baked will be nearly the same, but requires that Mixed Lighting be enabled within the lighting settings.
In Unity, emissive materials can contribute to lighting if Realtime GI or Baked lighting is enabled, giving the effect of area lighting. This is especially useful if Realtime GI is enabled
Volumes:
Volumes allow you to partition your Scene into areas so that you can control lighting and effects at a finer level, rather than tuning an entire Scene. You can add as many volumes to your Scene as you want, to create different spaces, and then light them all individually for realistic effect. Each volume has an environment, so you can adjust its sky, fog, and shadow settings. You can also create custom Volume Profiles and switch between them.
Just shared my experience while working on realistic lighting in unity. Hope this would give you some insights while you work on your own unity projects.
Thank you.
